Halloween Craft: Spooky Door Wreath

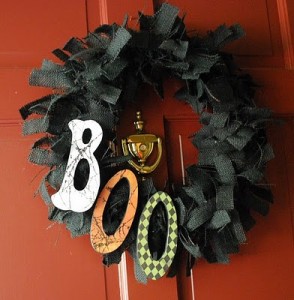
I love the simplicity of this wreath I found over at eighteen25!  I like that the burlap is just one color all the way around. Sometimes when you use a bunch of different colors the wreath gets a little too busy.   Most of all, I love that someone like me, who is sometimes challenged when it comes to crafting, could totally make this wreath and it would come out looking just as good as it does in the picture.  That is my kind of craft!

Here is what you need to make this Halloween Door Wreath:

  • 1 yard of black burlap cut into 1″x16″ strips {i used a rotary cutter, but if you want to prevent most of the loose strands on your wreath, you could use this burlap cutting technique.}
  • 14″ foam wreath ring
  • black paint {i used craft paint, but spray paint would work, too}
  • your SPOoKIEST findings to adorn this fab wreath

Here is the tutorial so you can make your own wreath -> Halloween Wreath Tutorial

Halloween craft ideas + Michael’s and Hobby Lobby coupons!

October is here and in my house, we’re ready to start Halloween craft projects!  We’ve already got our decorations up, but there’s always room for more!

If you’re planning on doing some Halloween craft projects, make sure you grab these coupons:

40% off one regular-priced item at Hobby Lobby

40% off one regular-priced item at Michaels

If you need inspiration, here are some Halloween craft ideas:

Kid friendly and budget friendly Halloween crafts

Halloween Craft:  Tin can luminaries

Halloween Craft:  witch and pumpkin yarn bugs

*This post may contain affiliate links. Please refer to my disclosure policy for more information


Michael’s: Save 20% off your total purchase + Halloween craft ideas!

Tomorrow is the first day of October!  I’m ready to break out my Halloween decorations and my kids are ready to start some Halloween craft projects!

There is a coupon for 20% off your total purchase at Michael’s here that will help you get a jump start on all those Halloween craft project–>20% off your total purchase Michael’s coupon

Here are some Halloween craft ideas that have been posted here recently to get you started:

Halloween tin can luminaries

Witch and pumpkin yarn bugs 


*This post may contain affiliate links. Please refer to my disclosure policy for more information

Halloween Craft: Tin Can Luminaries

Screen Shot 2013-09-01 at 5.12.55 AM

I absolutely LOVE this idea from Jane Lake at All Free Crafts.  Growing up we always had the traditional paper bag luminaries at Christmastime but they didn’t hold up very well.  The slightest gust of wind would occasionally knock over the bag or people would step on them.  Using a tin can instead is such a great idea!  I always have those laying around on my counters waiting to be put in the recycling bin.  I just know my kids are going to have a blast creating designs for their own luminaries.

Here is what you will need to make these Halloween Tin Can Luminaries:

  • clean tin cans
  • votive candles or tea light candles
  • pencil, crayon or permanent marker
  • paper and scissors (optional, depending on method used)
  • coat hanger or sturdy wire for hanging (also optional)
  • towel and firm work surface
  • hammer
  • large nail
  • freezer
  • water
  • spray paint

Here is the tutorial on how to make them. -> Halloween Tin Can Luminaries Tutorial

Back to School Craft: Get Organized!

Here is one of those projects where I stop and wonder why it is I never thought of this myself.  I hate clutter and I hate trying to find a safe place to put important paperwork.  If I leave it laying on a counter it is destined to end up with something spilled on it and if I put it in a drawer, then I completely forget it even exists.

So, what is a mom like me to do with all the paperwork kids come home from school with?  Momready comes to the recue with the paper tamer.  I love how this organizer hangs over a door so it isn’t cluttering my counters, but I can still put it where I can see it.  The example has a folder for each child, but I think I might do it a bit differently and have one folder for artwork, one with things that need to be signed, one with other important information, and one with pending homework assignments.

Here is what you need to make the paper tamer:

Legal Size File pockets (different colors)
Hole Punch
Small Phillips Head
Screwdriver
Hammer
1″ Binder rings
Reinforcement Labels

Here is the link to the tutorial from Momready -> Momready’s Paper Tamer Tutorial

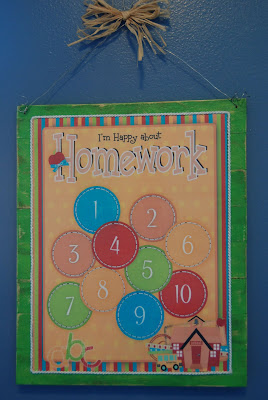
I also really love this idea from Burton Avenue to help motivate your kids to do their homework.  Check out the following link to get the free printables and tutorial to make the homework helper. ->Homework Helper Tutorial and Printables